Production
Production was the most important aspect of the project as it could determine the quality of my project, after quite a lot of decision making and time to consider what resources I had, I knew how I was going to edit my advertising Project.
I have some footage left from a previous project and my plan is to incorporate that into the project and format it as if the Advert plays during an actual program on the TV.
AnimatingMy starting off point was the Animation, I'd decided to make this project in an animation format because I felt that way I could include elements that typically couldn't be seen in live action, a perfect example would be Spider-Man swinging through the streets of New York and this is something that can't really be done in Live Action without the use of practical and/or visual effects but with animation, it's all created in the software itself.
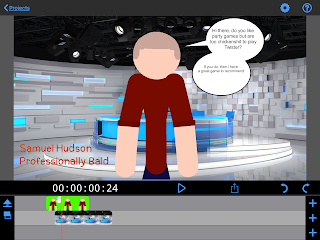
The project also gave me the chance to experiment with some Green Screen effects for the advert, however the other element seen in most of the advert is textfields and these are created in the animation itself rather than being added later on. The Green Screen however was a completely different process, I found a picture of a TV Studio and used that as my Background. I started by inserting the animation first as it had a Green background so I could composite the TV Studio background on top of it.
Editing
The editing process is what can determine the quality and tone of a piece and the editor themselves can actually control the pacing which for comedy is very important, I thought long and hard on how I was going to edit everything together and then I had a great idea, I decided to produce two edits of the advert.
The first edit was the advert on its own, I used all the animation clips I'd compiled together and I put together the final cut of the Advert, however the second cut featured the advert being played during an ad break on TV as if it was being played on TV.
The Main Advert Had it’s own difficulties during the editing process as I had to use several programs for it, the first of these was Stick Nodes Animator which I used for the animation seen in the Advert. The second software I used obviously was Premiere Pro which was used to compile the animations together during the actual editing process, the third of the programs I used was a Green Screen App for adding some of the backgrounds.
Let me explain, so during the animation process the first shot involves the animated character talking to the viewer about the game which was still animated but required a certain criteria so the Green Screen would work properly. Along with the text, speech bubble and the animated character I made that segment using a Green Background so that during post production which involved VFX and Editing, I could add in the background of the TV Studio during that phase.
- Learning
- Assembly
- Editing
- Colour
- Effects
- Audio
- Graphics
- Libraries
Each part of Premiere Pro is suited for the editing phase, but it’s more complicated than you may think.
This section of the software is where you can find the videos you’ve imported into the software for editing, here you can do a few things that are tied to the editing process, firstly if you double click one of your clips seen here then you can control how much of the clips go into the timeline which we will eventually get to.
This is the timeline and when it comes to editing, this is especially important because this is where you drag clips, audio samples and images into your piece. As you can see there are two main layers in the timeline, the top layer is where the video clips go and you just drag them into the timeline, if there’s audio in the clip then it will also be dragged into the timeline.
Audio however is entirely different, as when you want to drag in some audio you can drag it into the timeline and trim it down as well so basically you can do the same as what you can’t do with video clips.
Lastly, we have the viewing screens and there is a difference with both of them, the screen on the left is where you put audio and video clips to trim them down and then drag them into the timeline while the screen on the right is very important as the right screen allows you to watch what’s already in the timeline so far and after watching what you’ve got, you can either export the video (sending it into your computer, external hard drive or a USB Stick.


Comments
Post a Comment